This module allows you to make your own instruments with SuperCollider code. It has an automatic GUI system which is used to create and edit your own widgets. It's sequencing is driven by a fully featured piano roll. You don't need to be able to program with SuperCollider in order to take advantage of the instruments already designed in the Library. New instruments are constantly being created and can be automatically downloaded. See the Library in the LNX_Studio helpfile.
The programming guide for this module can be found here. How to program LNX_Studio.
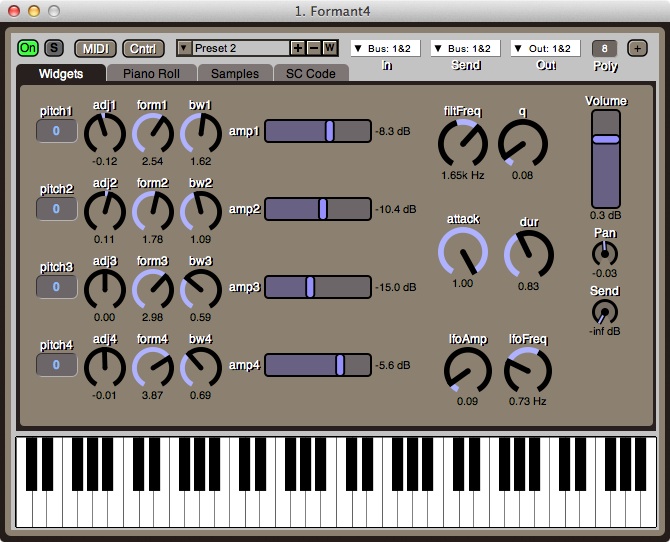
This is SC Code's window with the Widgets Tab selected.
You can play the keyboard with either the mouse or the QWERTY keyboard. See Keyboard GUI.
The Control Strip
This control strip appears at the top and it manages the general controls of the instruments.

- On/Off - turns SC Code On/Off. Right mouse or Alt-click will turn other instruments On/Off as well.
- Solo - solos SC Code. Right mouse or Alt-click will solo just this instrument.
- MIDI Settings - opens the MIDI In settings. See MIDI Devices & Controls.
- MIDI Control Editor - opens the MIDI Control editor and allows you to edit the MIDI controls you set up on this instrument. See MIDI Devices & Controls.
- Preset Manager - Add, remove or select presets, see Presets & Programs.
- Audio In channel - this sets where the audio input for this instrument is coming from. (i.e Which effect bus)
- Audio send channel - this sets where the audio send of this instrument is going. (i.e Which audio out bus or which effect bus)
- Audio out channel - this sets where the audio output of this instrument is going. (i.e Which audio out bus or which effect bus)
- Polyphony - the number of notes or voices that can be played simultaneously. Reducing this value helps to reduce CPU load.
- [+] (Edit) - opens the GUI Widget editing palette and a separate window for the SuperCollider code.
- Widgets tab - this is where you will find the widgets that control your instrument.
- Piano Roll tab - the Piano Roll sequencer page.
- Samples tab - if samples are used in the instrument this is where they can be managed.
- SC Code tab - this is where you will find the SuperCollider code that is used to build the instrument.
Widgets
The Widgets tab will look different from instrument to instrument but it will always contain a Volume and Pan control. All widgets can be edited in the Widget editing palette (to open this see item 10 on the control strip).
All widgets can be assigned to MIDI Devices & Controls.
Piano Roll
There is a Piano Roll tab for sequencing SC Code instruments. See the Piano Rolls help file on how to use this.
SC Code
This is where you can enter and edit your code that builds the instrument.
If you cmd-left click on any object text it will bring up a support menu for that object. For example if you have Pulse selected in the text below it will bring up a menu showing the arguments for that object, which if selected will be copied to the text. You will also find another menu which suggests similar objects you could replace it with.
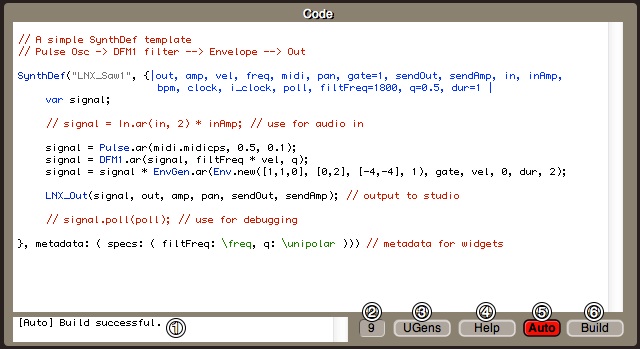
- Post View - Successful Build, Error and Poll messages are delivered here.
- Font Size - change the font size in the code view.
- UGens - a complete list of Unit Generators.
- Help - a link to the programming help file. If an object is selected in the code then it's help file will be opened instead.
- Auto - automatically builds the synth with every key press in the code window.
- Build - Manually builds the Synth when auto build is turned off.
Widget editing palette
This window is used to edit the GUI widgets in the Widgets tab. You can change the type, colour, position and size all widgets by selecting them with the mouse and changing their properties here.
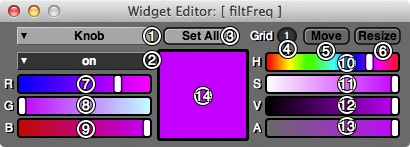
- Widget type - Select the widget type you wish to use. The options are: Knob, Dial, Smooth Slider, Slider, Flat Slider, OnOff Switch, OnOff Rounded, MIDI Note, Circle Switch, Number Box and Number Circle.
- Colour property - The selected colour property you are changing.
- Set all - Sets all the widgets that have the same colour property to this colour.
- Grid - Snaps both the Move and Resize adjustments to a grid of this size (in pixels).
- Move - When selected you can move widgets about with the mouse. (Hold Alt or right click to switch to resizing).
- Resize - When selected you can resize widgets with the mouse. (Hold Alt or right click to switch to moving).
- Red - Adjust the amount of red in the colour.
- Green - Adjust the amount of green in the colour.
- Blue - Adjust the amount of blue in the colour.
- Hue - Adjust the hue of the colour.
- Saturation - Adjust the saturation of the colour.
- Value - Adjust the value / brightness of the colour.
- Alpha - Adjust the alpha / transparency of the colour.
- Colour indicator - The colour being edited.
Samples in SC Code
In SC Code you can use samples in two ways. Either as a bank of samples, like you find in a drum machine or as a collection of samples recorded at regular pitched intervals, like that of a sampled piano. This tab lets you manage those samples. The top section is a Sample Player see Samples & The Web Browser.
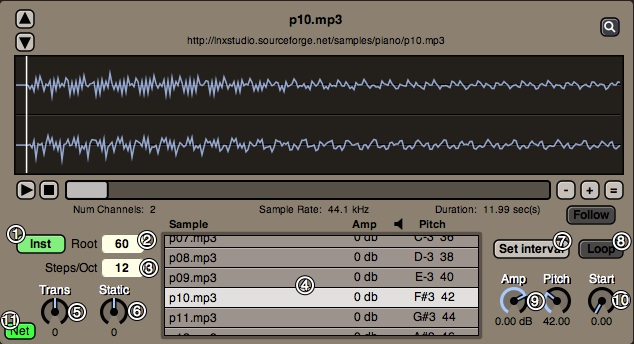
- Inst / List mode - In Instrument mode the sample that is chosen for playback is the one with the nearest pitch to that of the MIDI Note being played. If the pitch is not exactly the same the playback rate will be adjusted to bring it in tune. In List mode the samples are chosen with each MIDI Note having its own sample, the playback rate is not adjusted.
- Root - the root MIDI note all tuning scales are set to. In this example MIDI note 60 - C is always the same pitch no matter which scale you use.
- Steps/Oct - is the tuning scale used. This is in Steps Per Octave. Normally set to the Western scale of 12 steps an octave. For example this can be changed so you could have piano samples that are playing back as if there were 7 steps in an octave.
- Sample List - a list of samples, their amplitude adjustment and their root pitch. Above we have a piano sampled every tone or 2nd interval so the difference in pitch between each sample is 2. When you mouse click on the pitch the sample will play with a reference tone, which you can tune to set the root pitch of the sample.
- Trans - transposes the incoming MIDI notes up or down.
- Static - transposes the incoming MIDI notes but at the same time repitches the samples to playback the original tone. This has the interesting effect of using different samples to achieve the same tone. It almost sounds like a filter is being used but all that is happening if different samples are been selected and repitched to the desired tone.
- Set interval - if all your samples are in order and separated by the same interval, you can use this to set the root pitch for all samples. All you need to do is find the root note for 1 sample and then set the interval for all of them here.
- Loop - whether to loop the sample.
- Amp & Pitch - controls for the selected sample. The same values as in the Sample List but only for the selected sample.
- Start - index / frame for playback.
- Net - allows anything being played on the keboard to be networked and played on every computer in a colaboration, including MIDI In note events.
Once you have the samples loaded you need to use slightly different code to play them in your SynthDef. See How to program LNX_Studio.